Door Painting in Edmonton, AB, is a straightforward yet groundbreaking undertaking that can fundamentally improve the vibe of your home’s interior and exterior. Whether you’re hoping to revive an old, broken-down door or add a pop of variety to your stylistic layout, this guide will take you through the whole cycle. From readiness to the last contacts, you’ll find all tips and tricks you really want for a perfect completion.
Why paint your doors?
Painting your doors can have a few advantages:
- Stylish Allure: A new layer of paint can make doors look pristine and add to the overall style of your home.
- Protection: Paint goes about as a defensive layer, defending your doors from mileage, dampness, and different components.
- Cost-effective: Rather than supplanting old doors, painting them is a more reasonable method for refreshing your home’s look.
- Customization: With endless varieties and completions accessible, you can tweak your ways to match your own style.
Picking the Right Paint and Finish
Choosing the right sort of paint is vital for accomplishing the ideal outcomes:
- Sort of Paint: For interior doors, plastic-based paints are well known because of their low smell and simple cleanup. Oil-based paints are more sturdy and better for high-traffic regions, yet they take more time to dry. For exterior doors, choose paints explicitly intended for open-air use to endure atmospheric conditions.
- Finish: The completion you pick can influence both the look and toughness of your doors. Silk and semi-shine completes are brilliant for doors as they are not difficult to spotless and impervious to soil and stains. Gleam completes offer a glossy appearance and are exceptionally tough; however, they can feature blemishes.
Readiness Steps - Remove the Door: In the event that is conceivable, take the door off its pivots and lay it level on a couple of sawhorses. This makes it simpler to paint and prevents dribbles.
- Clean the Surface: Clean the door with a combination of gentle cleanser and water to eliminate soil, oil, and residue. Wash it completely and let it dry.
- Sand the Door: Softly sand the door with fine-coarseness sandpaper to make a smooth surface and assist the paint with sticking better. On the off chance that the door has old paint or stains, you could have to utilize a paint stripper or a more forceful sanding approach.
- Fill Any Defects: Use wood filler to fill in any breaks, openings, or scratches. When the filler is dry, sand it smooth.
- Tape and Safeguard: Utilize painter’s tape to cover any equipment or regions you would rather not paint. Set out a drop cloth to safeguard the floor.
Preparing - Preparing is a fundamental stage, particularly for crude wood or intensely finished doors.
- Pick the Right Preliminary: Utilize a groundwork that is viable with your paint type (oil-based or plastic). A stain-obstructing preliminary is suggested for doors with bunches or weighty stains.
Apply the preliminary: Apply a slim, even layer of preliminary, involving a brush for definite regions and a roller for level surfaces. Permit the preliminary to dry as per the producer’s guidelines.
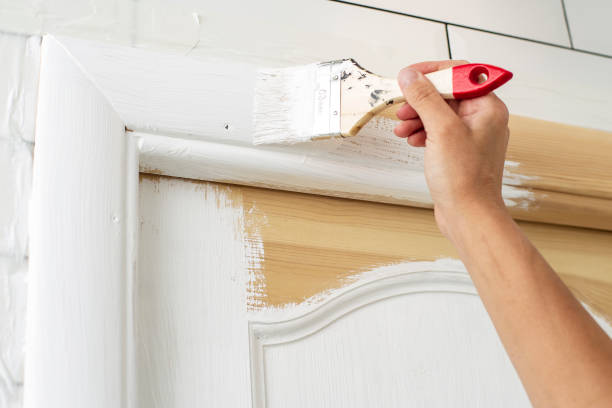
Painting Procedures
Accomplishing a smooth completion requires the right procedure:
- First Coat: Begin with the edges and definite regions utilizing a brush, then move to the level surfaces with a roller. Apply the paint in flimsy, even covers to keep away from dribbles and streaks.
- Drying Time: Permit the principal coat to dry totally prior to applying the subsequent coat. Follow the paint maker’s suggested drying times.
- Second Coat: Apply the second coat in a similar way as the first. Two coats are by and large adequate, yet a third coat might be essential for more obscure varieties or full inclusion.
- Smooth Completion: To accomplish a smooth completion, softly sand between covers with fine-coarseness sandpaper. Wipe away any residue prior to applying the following coat.
Reinstallation and Last Contacts
- After the paint has dried, now is the ideal time to wrap up.
- Reinstall the Door: Cautiously reattach the way to its pivots. Ensure it opens and closes without a hitch.
- Finish Up: Investigate the door for any missed spots or defects and finish them up on a case-by-case basis.
- Tidy Up: Eliminate painter’s tape and tidy up any trickles or spills immediately.
Upkeep Tips
To keep your painted doors looking new:
- Customary Cleaning: Wipe down doors with a soggy fabric to eliminate residue and soil. For harder stains, utilize a gentle cleanser.
- Stay away from brutal synthetic compounds. Utilize delicate cleaning items to forestall harm to the paint.
- Finish Up Paint: Save a limited quantity of final detail paint for minor fixes.
FAQs
Q: How long would it be advisable for me to stand by between layers of paint?
A: Normally, you ought to stand by around 4-6 hours between coats; however, it’s ideal to follow the painter’s proposals for ideal outcomes.
Q: Could I at any point cover up a formerly painted door?
Indeed, you can cover up current paint work. Try to clean, sand, and take action for the best grip and finish.
Q: Would it be a good idea for me to paint my door with a brush or roller?
A: Utilize a blend of both. Brushes are great for edges and point-by-point regions, while rollers are better for level surfaces to accomplish a smooth, even completion.
Q: How would I forestall brush strokes on my door?
A: Utilize excellent brushes and apply meager layers of paint. Gently sanding between coats can likewise assist with limiting brush strokes.
Q: How long would it be advisable for me to stand by prior to reattaching the door subsequent to painting?
A: Trust that the paint will dry completely prior to reattaching the door. For high-traffic regions, it’s ideal to hang tight for as long as 48 hours to guarantee the paint has completely restored.
End
Proficient door painting is a compensating project that can decisively work on the presence of your home. With the right materials, readiness, and strategies, you can accomplish proficient-looking outcomes that upgrade both the magnificence and usefulness of your doors. Whether you’re reviving a solitary door or refreshing every one of the doors in your home, this guide gives you all you need to know for an effective and fulfilling door painting project.